

Friday, February 12, 2010
Candy Cane Hearts
Happy Valentine's! This is a fun way to recycle your candy canes. I had seen the idea last year and made it a point to get some candy canes on clearance after the holidays. Bonus these were Starburst strawberry flavor, perfect for Valentines! I would love to get the tiny candy canes next year... perfect for little kiddos to enjoy. These would be darling hanging on a garland. Also it's fun to spell words out of the candy canes. For Christmas I think it would look great to spell out JOY for a cake topper. Maybe that's what we'll do when we make Jesus's Birthday cake next year. Thats a new tradition I have started to help the kids understand why we celebrate the holiday. Here is a link for the how to on making candy cane shapes. Enjoy!

Tuesday, February 9, 2010
Treasure Keeper Necklaces

Recently I made these with the kids as a fun project and posted a how to on my other blog. So I am including a link here. Treasure Keepers
Thursday, December 3, 2009
Place mat crayon roll - Tutorial
Here is a simple sewing project perfect for a stocking stuffer. Purchase a place mat at the dollar store.


So you should end up with both sides being folded in, like the picture below.
Now fold the bottom half up again for your fold/pocket to store crayons in about 3/4 of the way up.
 Add an elastic loop to the left about 10 inches long. Double elastic and tuck into fold leaving about 4 inches exposed.
 Sew both side seams up. Check to make sure elastic is secure. I stitched over it a few times to make sure it was really secure. Add pins for spacing for crayon placement and sew away.

ta-dah, finished product!

 The inspiration for this dollar store craft was this thrifted ikea place mat I cut in half and folded one time. I also added some cute ribbon to it. These will be accompanying us to the airport soon as we travel and will hopefully keep the kiddos happy during our travels!

Trim the tassels off the edges.

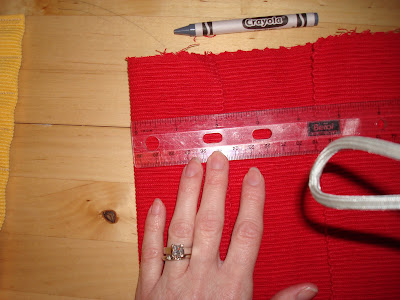
This place mat was about 12 inches tall. I folded the top edge down about 2 inches. Then the bottom I folded up about 3 inches. You may have to experiment with your folds based on the size of your place mat.

So you should end up with both sides being folded in, like the picture below.

Now fold the bottom half up again for your fold/pocket to store crayons in about 3/4 of the way up.

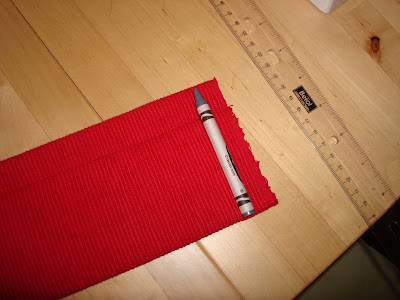
Check your spacing with a crayon as a guide.
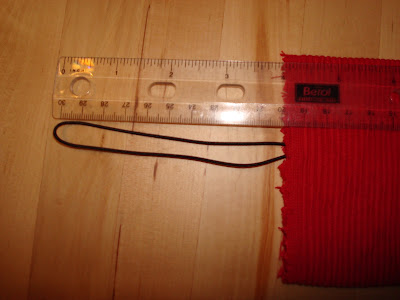
 Add an elastic loop to the left about 10 inches long. Double elastic and tuck into fold leaving about 4 inches exposed.
 Sew both side seams up. Check to make sure elastic is secure. I stitched over it a few times to make sure it was really secure. Add pins for spacing for crayon placement and sew away.
ta-dah, finished product!

All rolled up and ready to go!
 The inspiration for this dollar store craft was this thrifted ikea place mat I cut in half and folded one time. I also added some cute ribbon to it. These will be accompanying us to the airport soon as we travel and will hopefully keep the kiddos happy during our travels!
Tuesday, November 17, 2009
Birthday Number Shirt
This is a great idea for a Birthday gift. A number shirt. There are tons of tutorials on craft blogs for the how to. If you don't sew you can still do iron on heat and bond and it will hold up for a party. Best to sew around the number though and really easy. Kids love having the number they are on their own special shirt and it helps them recognize numbers. For this gift I included a matchbox car for the Birthday kiddos along with their shirt. Total cost for shirts, supplies and matchbox was around 11.00 to 12.00. Not a bad deal for the budget, eh?


Saturday, September 26, 2009
Decorated
So here is an assortment of finished miniature donuts. I love how the decorations turned out. I still have more in mind for this project before it is completed and it may even involve a giveaway!

The decorating part is longer than the making I discovered.

Next class I will learn to make mini cakes!

The decorating part is longer than the making I discovered.

Next class I will learn to make mini cakes!
Wednesday, September 23, 2009
Miniature food
I am currently taking a class for making minature clay food and am loving it! Here are a zillion mini donuts. There is a penny in the bottom of the box in the middle for scale. Next post I will share how they look once decorated!


Makes me kinda hungry for Tim Hortons!
Monday, September 14, 2009
Tissue Holders
 I recently made up a batch of tissue holders to give to the kids preschool teachers and my Bible Study group. I included a little card for each one with an inspirational message.
 I was really pleased with the outcome.
 You could also do a note that says
"Bless You!"
Subscribe to:
Posts (Atom)